

Over the last year or so, I’ve explored playing Elite Dangerous on GeForce Now with my HOTAS setup. If you’ve watched my video and/or read the blog post from last year, you’ll know that the solution I discovered wasn’t perfect. Through the use of Joy2Key, I was able to map my joystick movements to keyboard bindings for most actions. However, to my frustration, I never solved the issue of using the throttle with Joy2Key in the way I would use it natively.
Recently, I approached this issue from a different direction. While Joy2Key is tied to keyboard bindings, what about using the game controller option? GeForce Now supports game controllers and E:D supports game controllers. Although I would never use a game controller to control my ship if I played E:D locally, I couldn’t help but wonder if this might be the key to using my HOTAS for E:D with GFN.
As it turns out, it is.
After scouring Reddit and GitHub repos for solutions, it was a Reddit post that provided the solution to this problem. Here it is:
In short, the above solution allows you to translate your HOTAS into two simulated game controllers. These game controllers are recognized by GeForce Now and can be used for controller configurations in Elite Dangerous. The beauty of this approach is that it solves the throttle issue! You can now assign your HOTAS throttle to one of the analog sticks on one of the simulated controllers and then assign that axis to the throttle controls in E:D. Once set up, it’s about as close as I’ve been able to get to a native experience. The below video walks you through an overview and demo of how it works.
Although the above post gives you enough to get going, I wanted to expand on it a bit to provide a bit more detail.
However, before I get into that, I want to emphasize that although the below solution works for me, there’s obviously no guarantee that it’ll work the same way for you. I’ve seen comments in regards to loss of precision and how this may not be ideal in combat situations, so your mileage may vary. Regardless, I don’t think this will ever be as good as a native installation, but it’s close enough for me to enjoy the game again.
With that disclaimer out of the way, let’s dive in. Here’s a summary of what you need in some form.
- A copy of Elite Dangerous (Odyssey).
- GeForce Now 3080 Tier (although I’ve played E:D successfully on the Priority tier as well)
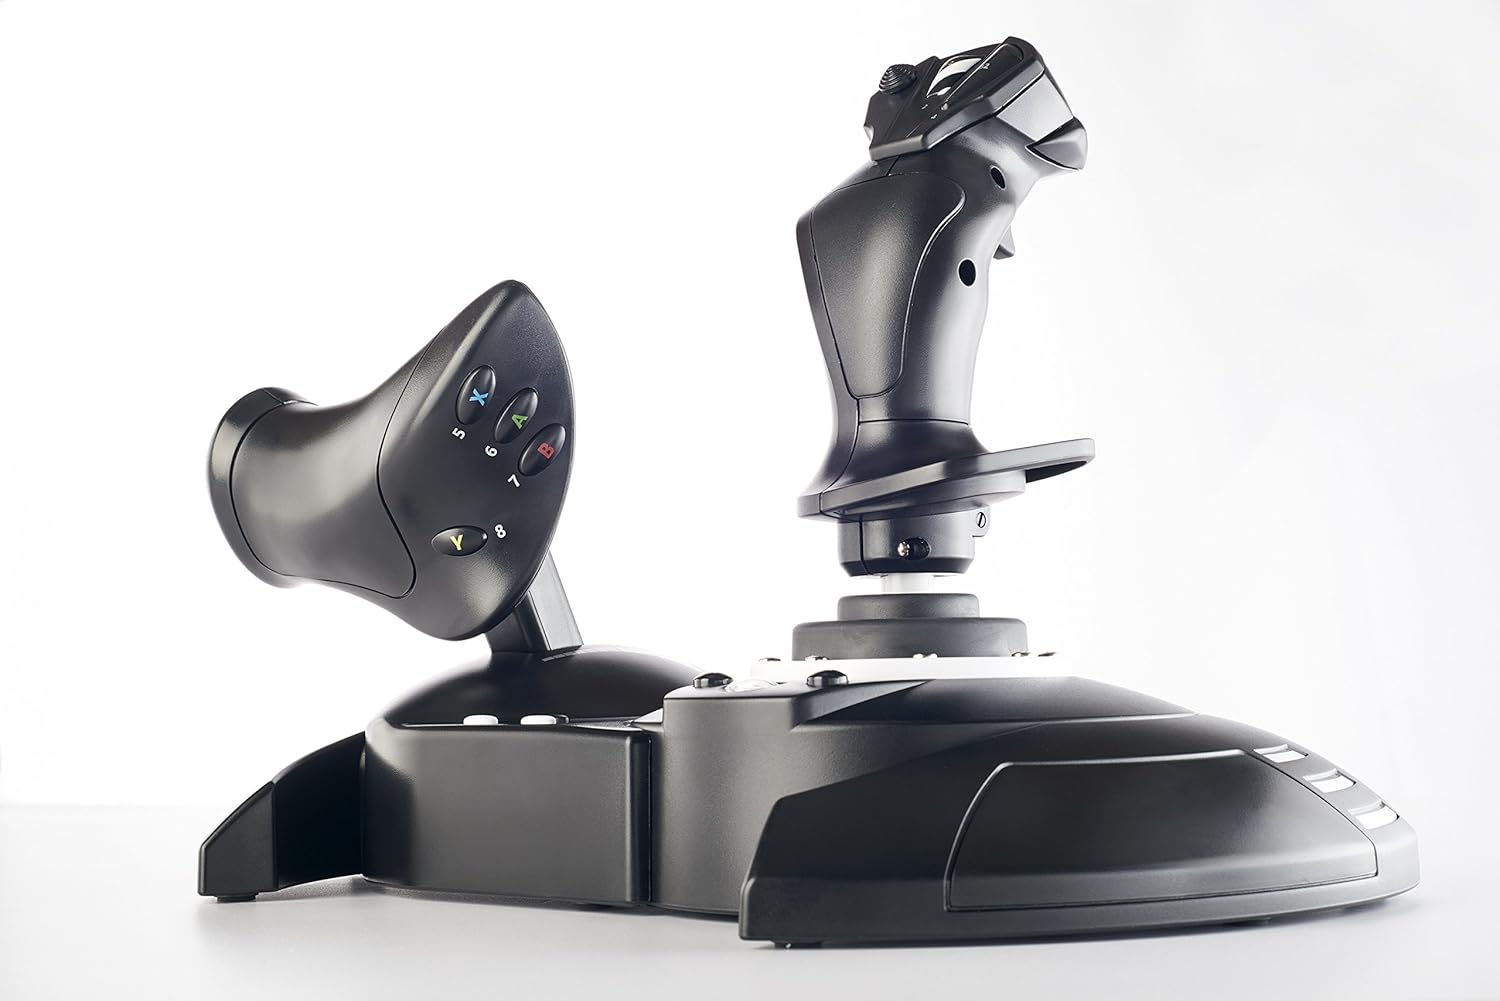
- Thrustmaster T-Flight Joystick (or other compatible HOTAS).
- ViGEm (Virtual Gamepad Emulation Framework).
- XOutput.
The Joystick
The reason I’ve gone with the T-Flight joystick from Thrustmaster is that it’s relatively cheap and it works both on my laptop and my XBox Series S. It works well with E:D, Flight Simulator and numerous other games. There are, of course, any number of other joysticks that will work with this solution, but what I’m sharing below is specifically for the T-Flight HOTAS. Feel free to adapt as needed if your hardware is different.
The Software
Besides the game itself (you can use both the Steam and Epic Store versions for GeForce Now), download and install the software packages below:
ViGEm
https://github.com/ViGEm/ViGEmBus/releases
There’s nothing else you need to do with this once installed.
XOutput
https://sourceforge.net/projects/xoutput/
XOutput allows allow you to setup multiple virtual controllers, which you’ll need for this solution.
Setting Up XOutput
Once all the software has been installed, it’s time to create the two simulated gamepads in XOutput. Plug in your joystick and check that it’s showing up in the list of controllers at the top of the screen. You can click “Edit” on your joystick of choice and verify that the inputs are recognized.
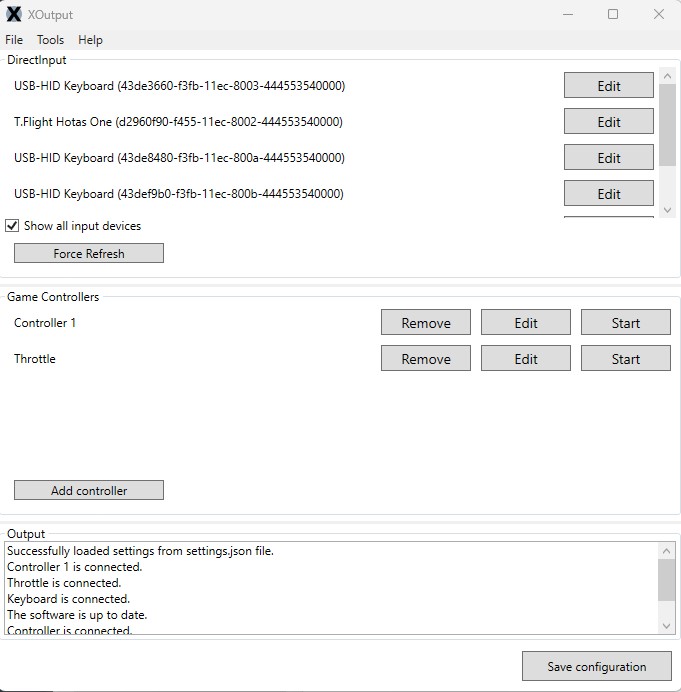
- Click “Add Controller” twice.

- Edit the first controller and configure the buttons and the axis as close as possible to a game controller. In my case, here are a few highlights.

- I’ve assigned the X and Y movements of the joystick to the left analog stick of the first game controller, or LX and LY.
- The throttle movement is assigned to RY while the twisting rudder function of the joystick is assigned to RX.
- The left and right trigger buttons (LTB and RTB) are assigned to F1 and F2 trigger buttons respectively.
- The left and right shoulder buttons (LB and RB) are assigned to the B1 and B2 buttons respectively.
- The L3 and R3 click actions on the analog sticks are assigned to the PREV and NEXT buttons.
- Edit the second controller and configure:
- The Slider for LX
- B3 and B4 to DPAD up and down.

You can download the configuration files at the link below. Simply unzip the file and move the settings JSON file to the same directory that XOutput is in. Note that this is specific for me to the HOTAS configuration I have and I can’t guarantee it’ll work with what you have, even if it’s the same controller.
The above configuration assigns the throttle to one of the analog sticks, which will allow you to operate the engine power of your ship as if you were playing the game natively (or close, at least).
The second controller picks up the leftover controls that just won’t fit on the first one, the slider of the throttle and the two buttons next to the slider. I use these for the navigational rockets (sideways, up and down), which works great for navigating while landing or taking off.
Tips Configuring Elite Dangerous
As I mentioned above, for the most part, I’ve tried to stick with one of the default controller layouts in E:D. I suggest you start with selecting one of the game controller control schemes in E:D, match it to your configuration in XOutput and change as needed. Below is a screenshot of my initial configuration. It still needs to be tweaked, but it works. You can download the PDF below or view the Google Sheet
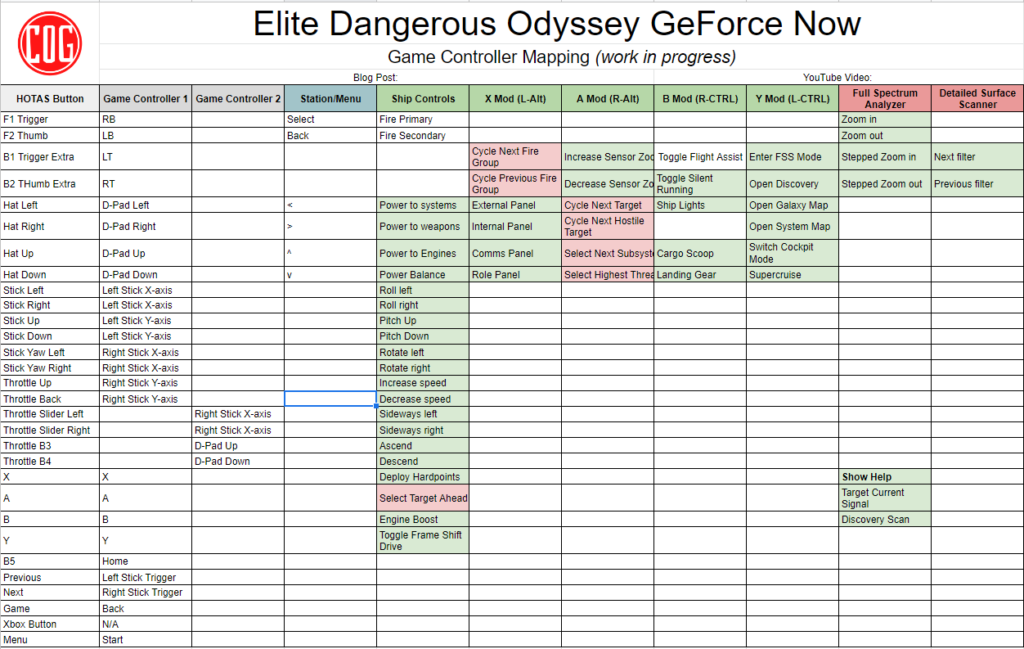
One important thing to keep in mind when assigning controls in E:D: On the configuration screens, there is no visual distinction between the X-Axis of the left stick of controller one and the X-Axis of the left stick of controller two. They’re both labeled the same. This actually threw me off initially. I thought both controllers were just the same (you’ll see my note about this in the comments in the Reddit post above) However, E:D recognizes the difference. By default, any analog axis will be associated with the first game controller (or so it appears to me). But, the second controller is also recognized, it just doesn’t visually distinguish between the two.
You can easily test this by assigning one axis to a control and then moving the axis of the other.
One aspect of the throttle control that threw me off initial was where to assign the throttle axis. What threw me off here was the default controller assignment that assigns the throttle functions to buttons. I tried to just replace the button assignments with the axis assignments, which didn’t quite work as expected. I only realized after a bit of confusion that the throttle axis assignment is actually a few rows up (top row in the below screenshot). This was, I think, the only control that gave me a little bit of trouble and although I’m confident you’ll avoid the same mistake, I felt it prudent to include just in case.

I hope the above information has been useful to you and breathes new life into E:D on GFN for you. I know it has for me. It raises the possibility of doing the same thing with other games, something I’ll have to explore later this year once I’ve had a chance to re-discover Elite Dangerous.
As always, if you have comments or suggestions, feel free to post them below.